

Building a Claravine Dashboard
Claravine has a natural fit in the digital media / marketing analytics world. We can structure, format, and expand data, not to mention move the data to various platforms.
My name is Julie Sabor and I’m a Senior Analytics Consultant at Claravine. I’m known as the person who can “connect things” based on my experience with architecting systems and implementing products. Apart from the typical experiences, I like to explore the outlier cases and share new, creative ways you can use Claravine – call me a carve-a-new-path-and-leave-a-trail kind of person.
Today I’ll take you through an easy four-step process for customizing your own dashboard – whether you want to troubleshoot, monitor, check campaign and usage performance, or something else entirely.
The Scenario:
We typically work with teams who have teammates all over the world, and sometimes you want to have a brief look at what the team is doing, so what do we need?
Sounds like a job for a dashboard!
Claravine has a reporting screen but I’m that person who likes to customize everything, and below are steps for how we are going to do that.
Claravine Elements we are using:
- Inbound/outbound integration support of AWS S3 bucket
- Outbound integration of Google Cloud Storage
- Claravine reporting elements with Claravine ids, template names, submitter name, created and updated dates
Step One: Get Your Codes in Order
When you onboard Claravine we have a great support team that walks you through how to set up a solid marketing channel system to track and expand all your campaign codes, and get them to your analytics platform.
Each of these codes are unique rows of structured data, and this provides the base for Step Two.
Step Two: Get that Data in the Cloud
Let’s get that data in the cloud! The cloud has so much flexibility and if you send all that beautiful, structured data into the cloud then you can use it elsewhere. For our purpose on this post, we need to retrieve a select number of fields so we can track usage.
On each channel template – or any template where you have a campaign code – we set up an Outbound Integration to our S3 bucket.
**Side note, set up your S3 bucket, and folder if applicable, as the destination for the csv file, here’s an example of mine:

Now you might have different field names on each of your templates, or you may not have that field – and that’s ok. Claravine can easily customize your csv header so all files have the same setup. If you don’t have that field, not a problem either, we have empty placeholders to take care of this with a couple clicks (literally … From the `+ Meta Field button, select Empty, click & type the new header name, click Save… ok, maybe it’s three clicks).
Once we have our bucket/folder, and we decided our csv headers, we take that set up and put it on all of our channel templates:

**Depending on your data viz tool, you could skip to Step 4 and connect this S3 bucket to your data viz tool. If this is not an option, I am going to take you down the Google Data Studio trail**
Step Three: Prepare the Loop
Let’s start preparing the loop. (This is one of my favorite implementations of Claravine and I’ll probably talk more on this in subsequent articles. For now let’s say you can join data, add data, add more keys, or repurpose to a new platform, which is what we will do in this step.)
To start this process, we create fields for our second template. These will be text fields with the same nomenclature from Step Two. The fields need to match exactly (no trailing spaces, no weird casing) to the way my csv headers are in my S3 objects (the outbound csv file from Step Two).
These will all be text fields in Claravine:

And now we create our template.
- Go to Settings -> Template, click the blue + button
- In Setup, give your template a name, description (optional, but very recommended), and assign a folder
- At Define and Govern, select all the fields from the above image and arrange in the same order as the outbound file from Step Two
- Lastly, on the connect option, we are going to setup our Inbound integration to the S3 bucket (the bucket/folder we setup in Step Two) and for Outbound, I am going to send data to Google Cloud Storage (similar to setting up the bucket/folder in Step Two, complete this process for GCS).
Right now you might be thinking, “Hold up. You can inbound from one cloud to another cloud?!” And to that I say, “YES. YOU. CAN.” See Claravine and the cloud work really well together, we can list objects, read and write back to your buckets, in whatever cloud – S3, Azure, Google, Box to name a few.
You also might be asking, “Why are you sending to Google Cloud?” To answer that, I want this data to connect in Google Data Studio; therefore, once my data is in Google Cloud, I have an open connection to all the Google tools, be it Big Query or Data Studio for reporting.
The last important (and best) part of this process is because Claravine can automatically detect new files in the inbound S3 bucket, it can automatically ingest and export out to the cloud without any user interaction. This is a seamless flow of data.
So here we go, we got that data back to the cloud, and we are ready for Step Four.
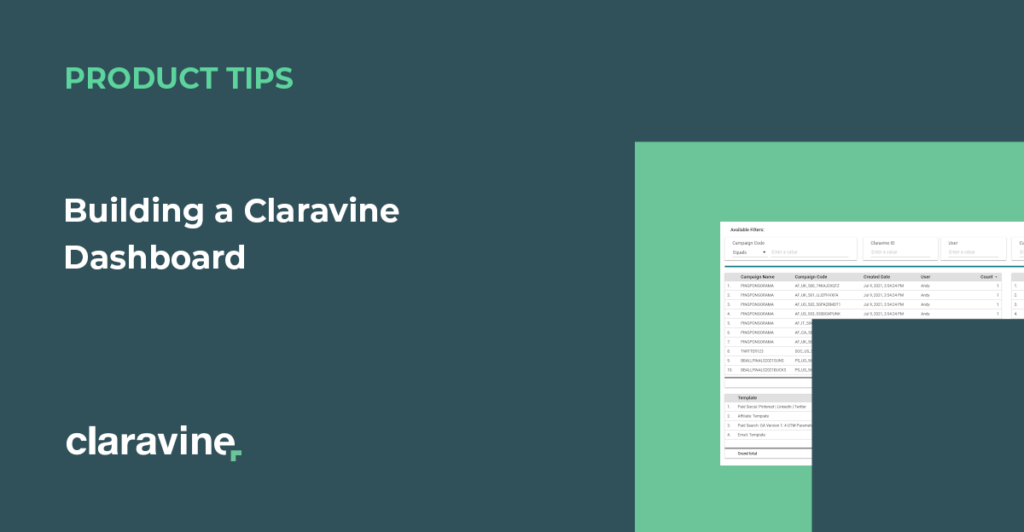
Step Four: Create Your Dashboard!
We standardized, collected, and sent our data away and here’s the fun part – let’s make a dashboard. You can create this however you like, but here’s a snapshot of how I did mine:

In my example, I table out the important stuff to me, I use dimensions & metrics that will allow me to make quick decisions, I utilize filters to drill down data, and bada bing bada boom, we made it to the finish line and we are dashboarding.
The Bottom Line: The World is your Cloud-Mobilized Data Oyster
All in all, this use case features a way to view the standardized data created in Claravine in a new environment. You can use this data for the following:
- Troubleshooting ❓
- Monitoring 🚔
- Campaign performance 📊
- Usage Performance 🧔👧
Want to run this solution or have a different idea in your Claravine instance? – talk with your CSM.
Want to blaze on a new path to get your data in check and don’t have a Claravine instance? – talk with our account team.
Hopefully this idea spurs you on another leave-a-trail moment and keep checking in with us for other ideas we can do. See you on the next path less traveled!